3.3 FastX Clustering Guide
Attention: This article is for the 3.3 version of FastX. Click here for the 4.0 version
Background
FastX is a platform for creating, managing, and connecting to Virtual Display Sessions (sessions) on remote Linux systems. Multiple systems can be run individually as standalone systems, but the real power comes from when those systems are linked together into a cluster. Clusters allow administrators to centrally manage multiple systems, create single entry points into the cluster event behind a firewall, Load Balance systems to allow even distribution of work, and many other features simplifying and improving the user experience.
An Overview of Cluster Configurations
Default Cluster

The Default Cluster setup is the basic configuration for clustering. In this setup, the Client (Browser or Desktop) has access to every machine in the cluster (either directly or through a VPN). The purpose of this setup is to connect to any machine and get rerouted if needed to a running session. FastX assumes all compute nodes are on the same LAN (or at least can directly access each other).
Gateway Cluster
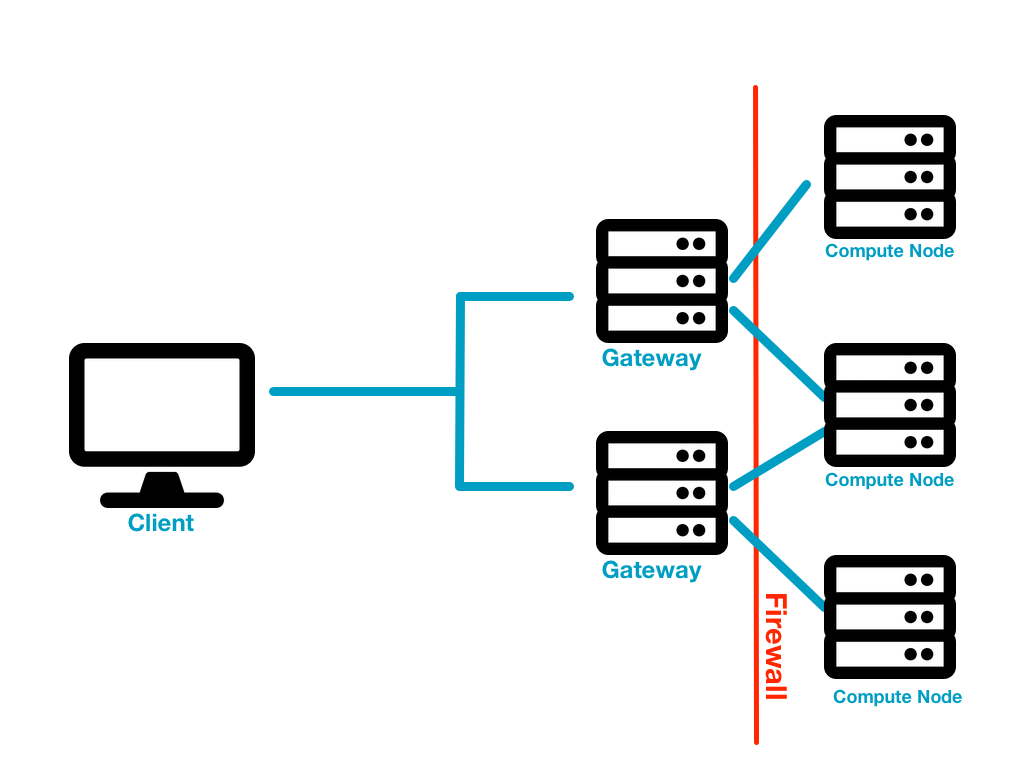
In the gateway scenario, the client does not have access to the compute nodes. Instead the client needs some sort of proxy to poke a hole through the firewall in order to access the compute nodes. Furthermore, there is no direct access from the external servers to the internal servers so a typical reverse proxy cannot work. FastX provides a special server called a gateway server that acts as the middle man. The compute nodes connect out to the gateway servers to establish the connection. Then the client connects to the gateway server to finalize the chain. The gateway server proxies the connection from the client to the compute nodes it is connected to.
This configuration is optimal for users who
- do not have a proxy server with an internal and external network card
- If you do, we recommend using the standard nginx (or equivalent) proxy
- want to isolate the compute nodes from the outside networks
Best Practices
FastX is designed to be extended into any type of network environment. The default cluster is the preferred configuration as it offers the best performance with least added load on the compute nodes. Every compute node can also act as a relay server that will proxy the connection to the other compute nodes. If the client tries to connect to a session running directly on the compute node the compute node will handle it as if it was a single server setup. If the client connects to Server A and tries to connect to a session on Server B, the client will first try to directly connect to Server B. If that fails, Server A will act as a relay, proxying the connection to Server B.
The gateway configuration is typically not recommended unless isolating the compute nodes on a private network is necessary. Gateway servers must proxy connections to relays which then will send the connection to the compute node. This adds extra network traffic and latency to each connection.
Setting Up a Cluster
Server Requirements
Each server in the cluster needs a copy of FastX installed and the web server component must be running. Each server is configured individually allowing for a hybrid cluster. Configuration will be discussed below. Administrators will typically configure the cluster manager first and then copy the broker.json file to /etc/fastx/broker.json
Users need a mounted home directory
Selecting the Servers in a Cluster
The first step in setting up a cluster is to define which servers will be in the cluster. FastX uses a shared database and a transporter for clustering. Any system with access to this shared database is considered a cluster member. Messages are communicated via a transporter. We assume all cluster members are on the same LAN. Larger installations with multiple user groups may wish to divide their servers into smaller clusters for each group.
Terminology
A cluster is a collection of services running on one or more servers. This service oriented architecture allows for different configurations to suit the customer needs
Compute Node
A FastX installation that can run sessions is called a compute node.
Relay
A user may connect to a FastX installation in a cluster that is NOT running the sessions he is trying to connect to. In this instance, the FastX installation will forward the connection to the destination compute node. Under these circumstances, the FastX installation is acting as a relay.
Cluster Manager
A cluster manager is the process that sets up the communication between the compute nodes and stores. It uses the transporter to communicate. Typically the underlying database, store service, and transporter are located on the same system. This system can also have a compute node (ie FastX installation) on it.
More information https://www.starnet.com/xwin32kb/fastx3-3-advanced-cluster-managers/
Store
FastX uses a shared database for cluster communication. The service that FastX uses to communicate with the database is called a store. Currently the backend database that FastX uses is MongoDB. The database itself can be located on any system as long as the store service can access it.
Transporter
Services communicate to each other through a transporter. Currently FastX supports NATS as the default transporter to communicate messages between services. Redis is also available as a legacy transporter.
Gateway
Services running on the outside network that act as a proxy to an internal relay.
Setting up the Cluster
Uploading Configuration from a Standalone to a Cluster
Once your cluster manager is set up, you may want to migrate your configuration into the cluster. FastX ships an upload tool to take a standalone configuration format and upload it into a running cluster.
- Make sure the store service is running. This is part of the cluster manager
- Run the command: /usr/lib/fastx/3/nodejs/bin/node /usr/lib/fastx/3/microservices/tools/upload-store.js config –bjf /etc/fastx/broker.json –dir /var/fastx/local/store
Downloading Configuration from a Cluster
- Make sure the store service is running. This is part of the cluster manager
- Run the command: /usr/lib/fastx/3/nodejs/bin/node /usr/lib/fastx/3/microservices/tools/download-store.js config –bjf /etc/fastx/broker.json –dir /var/fastx/local/store
Set up the Cluster Manager
Each FastX cluster member (compute node) contacts the cluster manager, which operates as a broker transport. The cluster manager also provides the database store, which could even be on a different system. Cluster managers can be duplicated in a load-balancing/redundant configuration, but this is beyond the scope of this document.
The cluster manager may also be a cluster member (e.g. FastX is also installed), but this is optional. If FastX is not installed, the setup script will download the necessary FastX microservices files.
- Download and run the FastX cluster installation script from
https://www.starnet.com/files/private/FastX3/setup-fastx-cluster.sh
- You can also run it by typing:
| curl -sL https://www.starnet.com/files/private/FastX3/setup-fastx-cluster.sh | bash – |
This will produce a broker.json file in the FX_CONFIG_DIR directory. If you don’t have FastX installed on this machine, this will be in the directory /etc/fastx/
- Edit /etc/fastx/broker.json Change the “host” field to the hostname of your cluster manager. For example
| { “transporterType”: “redis”, “password”: “s4j5D4RGwm2zrbit93SAobvxgikGEZkP259ivD6RPrkvWEYA5VP5WAFeITLJn4EO”, “host”: “hostname.example.com”, “port”: 6379, “rejectUnauthorized”: false, “namespace”: “fastx-cluster” } |
- If the cluster will communicate over the Internet, you should get a certificate for the cluster manager server. The setup-fastx-cluster.sh script will create a self-signed certificate. When you get your CA-issued certificate, edit the file /etc/redis.conf to change the tls-*-file lines.
- Open port 6379/tcp in the firewall. (Run firewall-cmd –permanent –zone=public –add-port=6379/tcp; firewall-cmd –reload) This will let the compute nodes communicate with the cluster manager.
Set up the Compute Node
- Install FastX
- Drop the broker.json file created above into the config directory (/etc/fastx/). Make sure the file is readable only by the fastx user. Read access to this file gives full control over the entire cluster, including the ability to change the admin or anything else.
- Run /usr/lib/fastx/3/install.sh. This will start the fastx3 service and connect it to the cluster via the message broker, following the settings in the broker.json file.
Connecting a Compute Node to a Gateway
Set up the Gateway
This step is not needed if
Your clients are on the same LAN (or VPN) as the compute nodesYour external server has an external IP and an internal IP.In this case, you should set up a traditional reverse proxy (nginx etc)
On your external server, run the command:
curl -sL https://www.starnet.com/files/private/FastX3/setup-fastx-gateway.sh | bash -
This will install the gateway service on your external server.
For more information and advanced installation, see the gateway guide.
These instructions are optional for administrators who want to use a gateway configuration. You do not need to set up every compute node to connect to a gateway server. You can specify a subset of compute nodes that will connect to different gateways. The gateway will proxy messages down to this compute node and then it will relay it to the destination node. Note that this will add extra load on specific compute nodes.
Copy the gateway.json file from the Gateway Server into /etc/fastx/gateway.json and restart the service
Debug the installation
If your fastx installation hangs when launching in clustered mode, you may be having trouble connecting to the broker. Follow these steps to debug the installation. Debugging logs a lot of data, so make sure to remove the environment variables when done.
- Shut down fastx: service fastx3 stop
- Run FastX manually with logging: LOGLEVEL=debug /usr/lib/fastx/3/tools/run-web
- For less logging: LOGLEVEL=info /usr/lib/fastx/3/tools/run-web
You may see error messages. If they are not easily understandable, contact support with the log
Monitoring Cluster Members
Verifying the Cluster is Working
Once the server is set up, it is a good time to make sure the cluster members are communicating properly. As an administrator the easiest way is to check the Manage Section of the website
- Click on the Manage Section (Graph Icon)
- Select Servers


Every server in the shared database that has been recently updated will be listed
If you do not see your server listed after about 90 seconds something has probably gone wrong and it would be good to check that specific system. You may also want to enable Debug logging on both systems in the cluster to log any issues. Debug logging prints a lot of information and should be turned off when not absolutely necessary.
To enable Debug Logging
- Click on the System Section (gear icon)
- Choose Local System > Debugging
- Check the Clustering Debug Options
- Save
- To view the log run the command in a terminal: /usr/lib/fast/3/tools/web-log
- This command is a shortcut to: journalctl -u fastx3.service -f


Cluster Member Data
Every FastX Server periodically updates the database with information about the state of the server. Lots of information is given including number of sessions, users logged in, CPU Load Average, free memory and many others. This data is helpful in defining monitoring and grouping similar servers together. Cluster member data is most often used in Load Balancing to decide which server to connect to.
Static Data and Metrics perform the same function in very different ways: namely to provide custom data to the server object. Static Data is used most often as typically the necessary information does not change from one update to the next. Metrics are used for transient data that is not already provided by the server update
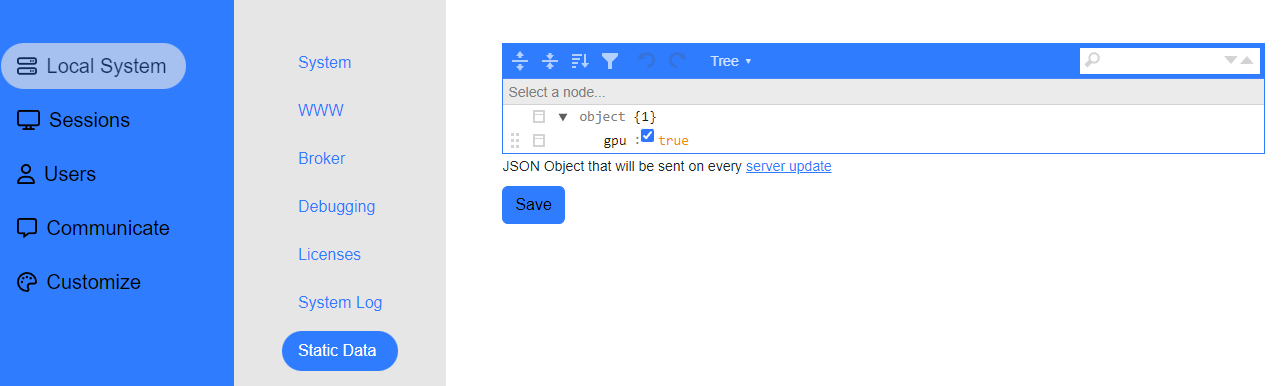
Static Data
Administrators who wish to add custom data to their cluster members should use the static data object. Static data is a JSON Object that gets sent with every server update request and is useful in defining the features of a server. Administrators who wish to subdivide servers into smaller sub-clusters should use static data.
- Click on the System Section (gear icon)
- Choose Local System > Static Data
- Edit the static data JSON object with the data you wish to send and save
Use Cases
Below are some typical use cases of when you would use Static Data. Remember that Static Data only adds information to the server update. This information will be used later in load balancing scripts.
- Some of your servers have a GPU — add “gpu”:true
- Only allow certain users access to the system — “users”: [“user1”, “user2” …, “userN”]
- Create server Groups — “group”: “mygroupname”
- Define login nodes — “login”: true
There are numerous examples of how administrators use static data. Use Static Data to fine tune your Load Balancing scripts
Logging in and Starting Sessions
Now that you have defined and set up your cluster, added your and things are up and running, it is time to move to the next step which is actually getting your users to the compute nodes so they can start sessions. The two main methods to do this are Load Balancing and Job Scheduling.
Load Balancing is a set of Javascript functions that are executed by the web server with the goal of finding a serverId to run the API call.
Job Scheduling is only used for Starting sessions. Job Scheduling takes the start parameters given by the user and tries to create a template command that will be executed as the user on the system. Technically the template can execute any command on the system, not just the start command. This feature is called Job Scheduling because the use case for it is to use a third party job scheduler to run the session start script some time in the future.
Load Balancing and Job Scheduling can be used together. The Load Balancing script selects ServerA to send the information to and the Job Scheduler creates a template that will be executed on ServerA.
Notes on Login Types
A full discussion of authentication is out of the scope of this document. However, logins can break down into roughly two types. Link Daemons and Non Link Daemons. Link daemons are logins which contain the claim “fastx/daemon” in their properties.
The purpose of a Link Daemon is to start sessions for logins that do not have an associated process running (Web Logins, OpenID Connect etc). When a user tries to launch a session on a cluster member that is not the one he logged in to, the start session attempts to authenticate via SSH to launch a Link Daemon. The Link Daemon is then available for future start sessions so a double authentication is only periodically needed.
Administrators can avoid double authentication by granting sudo access to the fastx user to launch the link command.
Load Balancing
The goal of load balancing is simple: select which server a session will be started on. Running sessions have a well defined server (the one where the process is running). A user’s login has a well defined server (the one who generated the login token). Configuration is always either local (the server the admin connected to) or global (synced across a cluster for all servers). The only time the server is not defined is at the start operation.
Every organization has different requirements for how to select a server either for starting sessions. Load balancing is defined by a custom javascript function that the administrator writes (or gets help from support!) to choose the server. Multiple javascript functions can be defined and chained together to sort, filter, and ultimately select the server to connect to.
**NOTE: Administrators can also choose to load balance SSH Logins. Documentation on Load Balancing SSH Logins.
- Click on the System Section (gear icon)
- Choose Sessions > Session Start
- Multiple Predefined scripts are shipped with FastX, or an administrator can create his own script by selecting Custom Scripts
- To Set your scripts, click on the Actions Icon and set the script
- Then choose the order of the scripts you want executed and submit


The Server List.
The Load Balancer takes an array of servers and passes it to the load balancing function to select from. Depending on your setup, servers may be filtered out before ever executing this function.
Servers with Start sessions… unchecked will be filtered out of the start script
Creating Custom Load Balancing Scripts
The default load balancing scripts that ship with FastX are often all you need to properly connect to your systems. Advanced administrators may want to create their own custom scripts to fine tune the way the cluster chooses which server connects to. In this case administrators should create custom load balancing scripts to pick the server. Load Balancing scripts can get complex. We typically recommend reaching out to StarNet Support before attempting to write your custom scripts as this can help ease the development of the scripts
The Load Balancing Function
The load balancing function is a Javascript function that takes an input object and returns a serverId (or other value, see below). Below is a basic example that returns the serverId of the system that the user connected to.
| function(input) { return input.local.serverId; } |
The Input Object
The input object is a JSON object that is sent to the load balancing function from the web server. It contains the following parameters
| { “action”: “STRING”, //the action that will be executed, “user/login” || “session/start” “user”: user_data, //the user data object “userGroups”: [“g1”, “g2”, “gN”], /* User’s Linux User Groups */ “isManager”: false, /* Is this user a manager */ “isAdmin”: false, /* Is this user an admin */ “local”: { //local server object “serverId”: “STRING”, //the serverId of the system executing the function }, “servers”: [ server_object1, server_object2, …, server_objectN], //array of server objects “data”: data_object, //the data passed from the user in the API request } |
User_Data
The user_data object is a JSON object that contains the information of the user making the request. The user_data object is different depending whether the script being run is a login script or a start script.
Login Script
The login script is run before a user authenticates. Therefore there is limited data available for the load balancer to use.
| { login:”STRING”, //the username that was passed during the authentication serverId:”STRING”, //the serverId that was passed by the user during authentication (could be empty) sessions: [session1, session2, … sessionN] //the sessions associated with the login name } |
Start Script
The user_object for the start script contains all the parameters in the login scripts user_object (“login”, “serverId”, “sessions”) as well as the login information available.
Server_Object
The server object is the data passed from each server during a server update. See Server Api
Session_Objects
The Return Value
The load balancing function can return several values.
String
If the function returns a string, return value will be used as the serverId to connect to. Make sure this is an actual serverId that exists in the cluster (ie. don’t just return any string)
Array
If the function returns an array, this new array will be used as the new set of server objects that will be passed to the next load balancing function. This return value can be used to filter out specific servers.
Falsy Value
If the function returns something that evaluates to false (undefined, null, 0, “”, etc), the load balancer will move on to the next function in the list using the previous input object.
Errors
Any errors that occur will stop the load balancing scripts from running and return the error object to the user to display. You can use this to throw custom error messages, for example “All GPU servers are in use”
If the load balancer has run through all load balancing scripts and still has not returned a string (ie serverId), then an error will be thrown.
Job Scheduling
Up to this point we have focused our discussion on choosing the server to log in to and choosing the server to start new sessions on. When starting a session, what happens when the server you want to pick is not yet available? This is where job scheduling comes in. Job scheduling allows an admin to replace the session start command with a different command and pass the user’s start parameters to this new command.
The replacing of the start command allows administrators to integrate their own Job Schedulers into FastX. Instead of launching a new session, FastX returns text that can be displayed to the user. When the session is eventually started, the session will appear in the session list. Sessions can start immediately, after a short time, or not at all.
To get to the Job Scheduling section
- Click on the System Section (gear icon)
- Choose Local System > System

The Job Scheduling Script
The Job Scheduling Script is an executable file on the local system that the web server will execute instead of the default start script. The script takes a JSON object in stdin which is the input from the web server.
Any output is relayed back to the user on success.
The Input Object
The Job Scheduling function takes a JSON input object that the Job Scheduler can use to make decisions about how the session will be launched
| { “user”: login_object, //The user’s login object, “admin”: true, //Is the user an administrator, “start”: start_data, //The data that was passed from the user to the start API call” } |
Login Object
Start Object
The Return Value
The Job Scheduling function will return a string
String
The string returned from this script will be parsed. If the string is a JSON object, the FastX web server will attempt to check if its format is similar to the return of the default start command. If it is, then the session will automatically connect. Otherwise the string will be parsed and returned to the web server as output.
Conclusion
FastX’s clustering capabilities are fairly complex and very flexible to be able to fit your organization’s needs. Administrators can choose to use parts or all of the features to build clusters that will integrate into the organization’s existing infrastructure. Load Balancing and Job Scheduling allow administrators to redirect workload across the cluster in a way that will help them maximize the ROI in their computing devices.