FastX Integration
Introduction
FastX is highly configurable out of the box. Administrators who wish to fine tune their installations to add extra functionality should read this document. Integration is a general term for features related to customizing FastX in such a manner that it can be combined with other functionality in your infrastructure. This can be simple features like changing the look and feel with themes, to complex customizations using the API to build custom clients that extend the use of your current website.
Themes
Theme support allows users to customize the look and feel of the FastX website. The user interface makes it easy to change the basic colors and add logos to the new theme. More savvy administrators can fine tune the theme to their liking. FastX is built using Bootstrap 4 and Sass to create themes. Users can change colors, tag lines, images and just about any other component of the website to make a more consistent look and feel across your infrastructure.
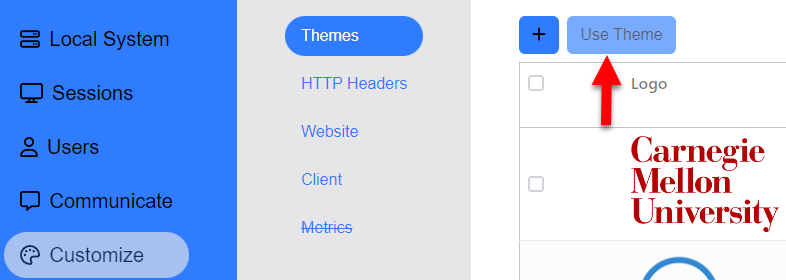
Click on Customize > Themes
Setting the Theme
Highlight the theme you want to use. Click the Use Theme button
Website Settings
Administrators may wish to customize the website to better integrate into their current websites. There are several website settings that can be changed to help this.
Click on System > Web > Website Settings
Website
Administrators may wish to customize where users land when they connect to the FastX website.
Homepage
Sets the default home page of the website when you first log in and when you click on the home page button in the top left corner of the page.
Autoconnect to Bookmark
Administrators may want their users to go directly to a Shortcut Session after logging in. Set the bookmark that the user should connect to. Note, users can disable this in their own profiles.
Default Login Page
Administrators who have enabled OpenID Connect functionality should have their users route to the OpenID Connect Login Page when initially connecting. This way they can have single sign on functionality. This does not stop a user from going to the other url if the user knows where the other login page is.
Setting the Welcome Page
If the Welcome Page text is not blank, it will display this page when the user first connects to the FastX web server. This is a custom HTML page that the administrator can use to give, users information (or warnings to leave if unauthorized). After the user has seen this page, a session cookie will be set meaning it only appears once until the web page is closed from the browser.
Custom Error Pages
Administrators can add custom 403, 404, and 500, HTML error pages that will be shown to the user if that HTTP error is thrown, further integrating FastX into a current website.
Notifications
Users can set notThe notification feed is in XML/ATOM feed format. You can access it in the following locations
Formatted Feed
https://server.example:3300/notifications.html
This feed has basic XSL formatting
XML Feed
https://server.example:3300/notifications
This feed is the pure XML version that integrators can use
Public Feeds
Notifications that were marked as public do not need a login to view.
https://server.example:3300/notifications?public=true
Query Parameters
public: boolean — Filter out private messages. Admins can use this for the public feed
limit: int — limit the number of entries
offset: int — number of entries to offset (used for pagination)
Running FastX through an nginx proxy
If you plan to run FastX through an nginx proxy you should set the following
| setsebool -P httpd_can_network_connect 1 proxy_buffering: off |
Single Sign On
FastX supports single sign on for systems that support OpenID Connect. Administrators set up the OpenID Connect relays in
Users > OpenID Connect
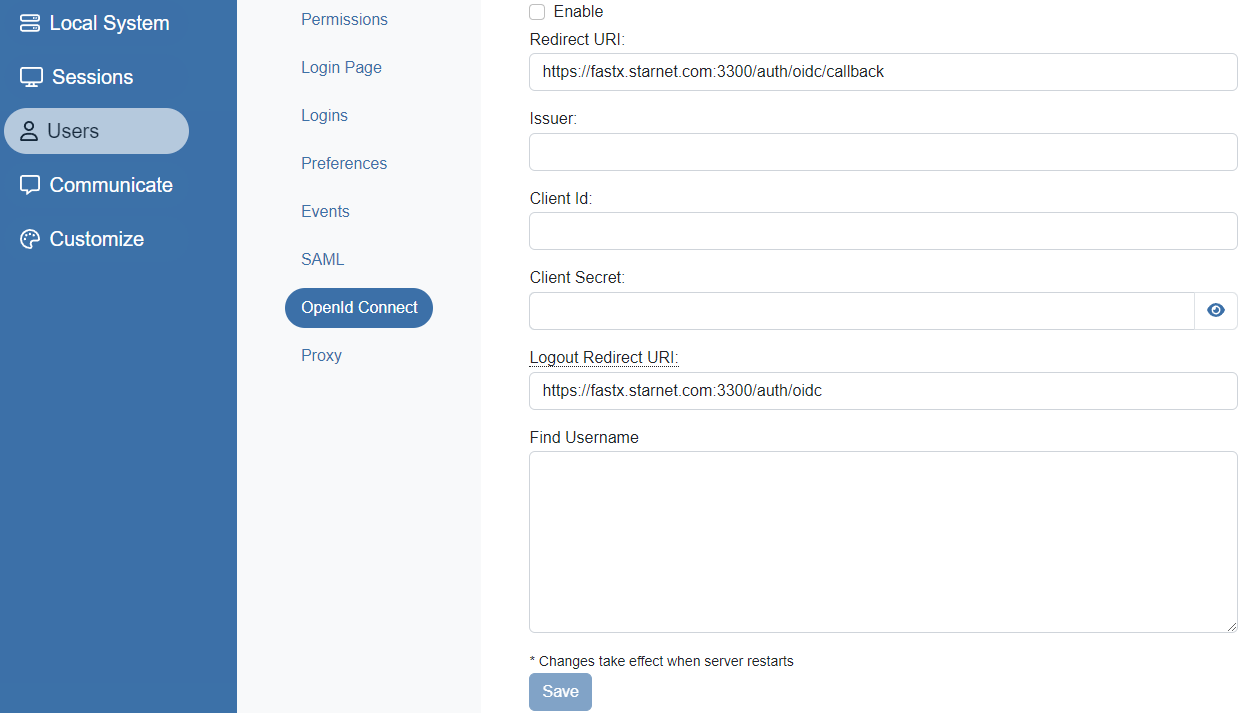
This allows users to gain access without adding their ssh login credentials. However, when a user intends to start a session, the SSH login credentials will then be needed unless administrators have set up Sudo Link Authentication
Proxy Authentication
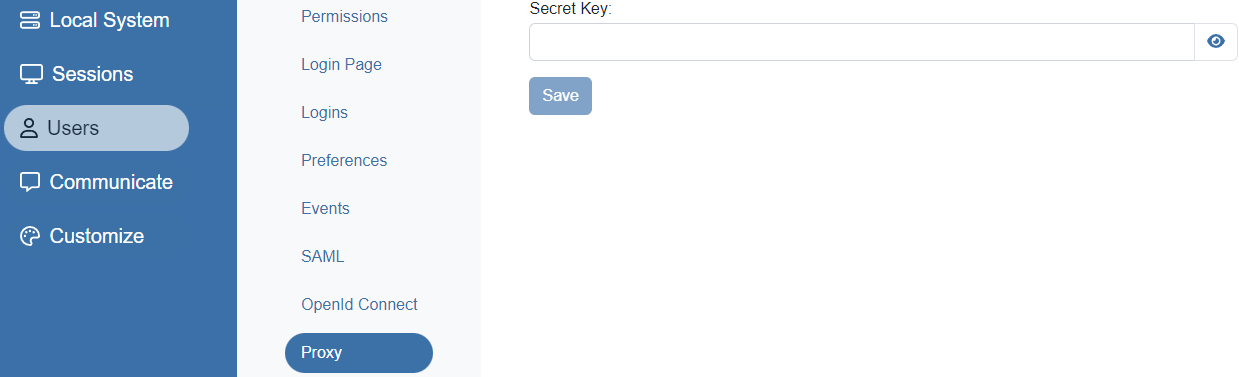
For administrators who wish to use their own authentication schemes, proxy authentication is available. Proxy authentication allows admins to create their own JSON web tokens based off of a shared secret that will be honored like a JWT created by the web server. This simplifies accessing the API as a user no longer needs to log in to create a JWT. Administrators set up the Proxy by going to the System Configuration.
Users > Proxy
For more information see Logins
Job Scheduling
FastX can be configured to use a third party job scheduler (LSF, MOAB, SLURM etc) to execute commands and then launch a FastX session when the job has been completed sending the DISPLAY back to FastX.
Instead of returning immediately, FastX will return output that can be shown to the user. Then when the job has completed, the FastX session will show up in the session browser window.
A deeper explanation of job scheduling can be found here
Custom Forms
Custom Forms allow administrators to get extra data from a user when starting a session. This allows users to better integrate with Load Balancing and Job Scheduling. Administrators can setup Forms by going to the System Configuration.
Sessions > Forms

For more information see Starting Sessions.
Session Events
A session event is a general term for when an action happens on a session. Session events can be divided into several categories. Each category has its own way of handling the event but the result is the same. Administrators can set up Session Events to execute custom code to better integrate other products into FastX.
API Events
API events are scripts that are executed before FastX makes the API call to the session. This enables administrators to restrict commands, deny methods to users, or do any other informative task that they wish. These events are executed as the FastX web server user.
API events are found in Sessions > Events

API events can be set on any event that the administrator chooses.
Event Function
| async function (o) { //modify the input object before the api call is processed //Your script should return the input object (o) //throwing an error will cause the API call to fail //use this if you want to prevent APIs from being executed //throw new Error (‘API is disabled’); return o; //successfully return input object and API can continue } |
Input Object
| { “action”: ‘session/connect’, /* The API Event being called */ “login”: username, /* User’s username */ “token”: API_TOKEN, /* User’s API TOKEN */ “session”: SESSION_OBJECT, /* Session object (if not start/schedule) “data”: API_DATA, /* Data sent to the API call */ } |
Return Object
The object returned should be in the same format of the input object. You can change the data object as needed. This new data object will be used as the API data that will be sent to the server.
Throwing Errors
The API call will fail if an error object is thrown in the API Event. This has the effect of disabling the call for certain users. If you want to generally disable an API call across a cluster, you should use FastX Permissions.
Update Events
The FastX Session periodically updates the FastX web server when new data is available. Administrators who want to execute an event on an update like this should use the update event. This event will be executed as the FastX web server process owner.
Update Event Function
The update event function is a javascript function for executing event actions.
| function(oldSession,newSession) { if(!oldSession) { //Session Started } else if(newSession.terminated) { //session has terminated }else if(newSession.clientCount > oldSession.clientCount) { //client connected } else if(newSession.clientCount < oldSession.clientCount) { //client disconnected if(newSession.clientCount === 0) { //all users disconnected } } } |
Input Objects
oldSession is the session data that is currently in the database. If this is a new session (session started) this is null
newSession is the new session data that has just been updated by the FastX session
Return Value
The return value is not used.
Profile Scripts
If a FastX session is started with a profile that has “Event Scripts” specified, those scripts will be run as the same user who is running the session. The various events are triggered when the following events happen:
- ‘start’: Triggered soon after the session starts.
- ‘connect’: Triggered when a connection is made to the session. [To be slightly modified when we implement sharing.]
- ‘disconnect’: Triggered when the connection to the session is disconnected.
- ‘params’: Triggered when the params of a session (such as the name) are changed.
- ‘terminate’: Triggered when a session is terminated.
With the exception of ‘terminate’, the scripts that are triggered run in the background. This means that if the script is long-running, the session may terminate while the script is still running. In the case of ‘terminate’, the session monitor will not exit, and thus the session directory will not be removed, until the terminate script exits.
One Liners
If the script specified is a single line (after removing blank lines at the start and end), it will be run under the shell. This means that special characters, such as file pattern matching, environment variable expansion, and file redirection, will all work.
Script Files
If the script is multiple lines, then the entire script is put into a script file, which is executed when the trigger happens. This means that any multiple line event script should start with an interpreter, e.g. !/bin/bash.
Environment Variables
The following environment variables will be set for an event script:
$DISPLAY, $XAUTHORITY, $FASTX_SESSION_ID, $FASTX_SESSION_DIR, as well as the usual ones (HOME, USER, etc.)
This means that the event script could run an X11 application, such as xmessage or xwininfo.
Custom Channels
FastX 3.1 implements the ClientComm channel which lets custom channels to flow from client to server and vice versa. The ClientComm channel is documented in ClientComm.
FastX API
The FastX API is a fully documented REST API that allows users to execute commands . See FastX API for the list of commands.
Making Requests
A typical API session consists of the following:
- Getting an API Web Token (ie logging in)
- Executing API Commands
- Logging Out
CURL Example
curl --insecure -X POST -H "Content-Type: application/json" -d "{ \"username\": \"myuser\", \"password\": \"mypassword\", \"basic\": true }" https://pc130.starnet.com:3300/v3/api/auth/ssh
Explanation
curl
--insecure : ignore SSL errors
-X POST : send as a post request
-H "Content-Type: application/json" : post the data as JSON
-d "{ \"username\": \"myuser\", \"password\": \"mypassword\", \"basic\": true }" . : post data in json format
https://pc130.starnet.com:3300/v3/api/auth/ssh : the api url
FastX CLI
The FastX server comes with a command line client that allows users to execute api calls to the web server.
Basic Usage
The Command Line client will automatically log the user in locally and generate a FastX Authorization Token. This simplifies the setup
Command Line Parameter Format
/usr/lib/fastx/3/tools/fastx-cli [api_method] –arg1=arg1 –arg2=arg2 …
- api_method — The API method as described in FastX 3 API
- arg1 – argN — The parameters of the API method
JSON Format
/usr/lib/fastx/3/tools/fastx-cli [api_method] –json='{ JSON_OBJECT }’
- api_method — The API method as described in FastX 3 API
- json — The parameters of the API method as a JSON string
Advanced Usage
Generating a token
/usr/lib/fastx/3/tools/fastx-cli token create
This will generate a token to be used at a later time. The basic version automatically does this for you when executing the api call
Shutting down the link daemon
/usr/lib/fastx/3/tools/fastx-cli shutdown
FastX runs a daemon called link in order to start new sessions. Shutting this down will force a user to re-authenticate when launching a new session. Other API calls such as listing sessions and performing actions on running sessions are not affected by this command.
Integrating FastX Into Other Websites
Integrators who want to add FastX into their own web site should do the following
- Create an iframe connecting to the client
- Use the FastX API to make a connect call.
- Take the “result” object of the Connect call and BASE 64 encode the object
- Add it to the fragment #BASE_64
The resulting iframe should look like this
| <iframe src=”https://server.example.com:3300/client/custom#BASE_64_RES” style=”width:100%;height:100%” ></iframe> |
/client/custom
Note that unlike a typical connection, when integrating the url is /client/custom. This url is designed specifically for integrators.
- It does not check to see if the user is logged in
- It does not issue any API calls when connecting
- It gets all API data from the fragment #BASE_64
Sending/Receiving Messages From FastX
if you wish to send or receive messages from the FastX iframe you can add the following script to your HTML page header.
| <script src=’https://fastx.example.com:3300/tools/client-api.js’></script> |
This script will create the FastX class to your global namespace. Add the following line in your HTML. You can then access the API like this.
| <script> var myIframe = document.getElementById(‘fastxIframe’); var fx = new FastX(myIframe); fx.onready = function(e) { //Add your ready code here. e.g. //fx.resize(window.innerWidth, window.innerHeight) } </script> |
Api Callbacks
onmessage(e)
Emitted when any message gets sent.
onready(e)
Emitted when the protocol has finished its initial setup.
Api Commands
send(msg: string, body: object)
Generic function that will send arbitrary messages to the iframe. Typically not used
resize(width: number, height: number)
Send a resize request
keyboard(layout: number, type: number)
Change the keyboard layout. Refer to https://docs.microsoft.com/en-us/windows-hardware/manufacture/desktop/windows-language-pack-default-values for valid keyboard layouts
networkAutodetect(enabled: boolean)
Enable network autodetection
compression(current: number, min: number, max: number)
Set compression level (lower is blurrier)
frameRate(current: number, min: number, max: number)
Set the frame rate
frameWindow(current: number, min: number, max: number)
Set the number of interim frames before the server stops sending data
scaling(current: number, autoscale: boolean min: number, max: number)
Set the client side scaling. Autoscale lets the client determine it for you
mouseDown(flags: number, pos: Array<number:number>)
Send a mouse down event. Refer to https://developer.mozilla.org/en-US/docs/Web/API/MouseEvent/buttons for flags. pos is an array of [x,y]
mouseUp(flags, pos)
Send a mouse up event. Refer to https://developer.mozilla.org/en-US/docs/Web/API/MouseEvent/buttons for flags. pos is an array of [x,y]
mouseMove(pos)
Send a mouse move event. pos is an array of [x,y]
mouseWheel(delta, pos)
Send a mouse wheel. Negative delta is scroll up pos is an array of [x,y]
keyDown(code)
Send a keyboard down event. Refer to the code strings at https://developer.mozilla.org/en-US/docs/Web/API/KeyboardEvent/code/code_values for a list of code values
keyUp(code)
Send a keyboard up event. Refer to the code strings at https://developer.mozilla.org/en-US/docs/Web/API/KeyboardEvent/code/code_values for a list of code values
keyPress(code)
Shortcut for
fx.keyDown(code);
fx.keyUp(code);
Additional Integrations
The FastX browser client shows its own menus and dialog boxes. Integrators may wish to disable part or all of these features and handle them in their own code for a better look and feel
Hide Client Menu
System > Customization > Client Settings > Hide Client Menu will hide the menu bar in the middle of the running FastX session. Integrators can post messages to the FastX iframe to enable the events in the menus (eg. change geometry)
Hide All Dialogs
System > Customization > Client Settings > Hide All Dialogs will prevent any modal dialogs (typically a disconnect error) from appearing. These events are still propagated up to the iframe’s parent where the integrator can handle the event using his own error handling system.
Stop Message Propagation to iframe parent window
By default, all protocol events are propagated to the parent window of the iframe. System > Customization > Client Settings > Stop Message Propagation to iframe parent window turns event propagation off so the parent window will not receive any messages
Hide Home button in menu
The client menu has a Home button that will link to the FastX Session Configuration portion of FastX. Integrators of FastX may not want that button. System > Customization > Client Settings > Hide Home button in menu will hide this button
Home button opens in the same window
System > Customization > Client Settings > Home button opens in the same window decides when clicking the Home button, open in the same window (which would effectively disconnect the session) or open in a new window
Url of the home button
System > Customization > Client Settings > Url of the home button is the uri that the home button will link to. Integrators may wish to keep the home button, but have it link to some other “home” page, like the base page of their product.